ExTiX 19.0 with Deepin 15.5 Desktop, Refracta snapshot, Calamares 3.2.2 Installer, Kodi 18.0 and kernel 4.20.0-rc4-exton – Build 181208
 NEWS 181208 ABOUT ExTiX Deepin 19.0
I’ve released a new version of ExTiX Deepin today with Calamares 3.2.2 and kernel 4.20.0-rc4-exton. Calamares is an installer framework. By design it is very customizable, in order to satisfy a wide variety of needs and use cases. All packages have been updated to the latest available version as of today. Study all installed packages in ExTiX Deepin Build 181208. ExTiX is based on Debian and Ubuntu 18.10.
About ExTiX 19.0 with the Deepin 15.5 Desktop
I’ve made a new extra version of ExTiX with Deepin 15.5 Desktop (made in China!). Deepin is devoted to providing a beautiful, easy to use, safe and reliable system for global users. Only a minimum of packages are installed in ExTiX Deepin. You can of course install all packages you want. Even while running ExTiX Deepin live. I.e. from a DVD or USB stick. Study all installed packages in ExTiX Deepin. Note that also Kodi 18 RC2 Leia is pre-installed with some video add-ons. Kodi (formerly XBMC) is a free and open-sourcemedia player software application developed by the XBMC Foundation. It allows users to play and view most streaming media, such as videos, music, podcasts, and videos from the Internet, as well as all common digital media files from local and network storage media – cite from Wikipedia.
ABOUT ExTiX
All five ExTiX systems are based on Ubuntu and Debian.
The Ultimate Linux System
I’ve called my different versions of ExTiX The Ultimate Linux System for many years by now. As regards ExTiX 19.0 Deepin I feel it’s especially justified. Everything just works.
Refracta Tools
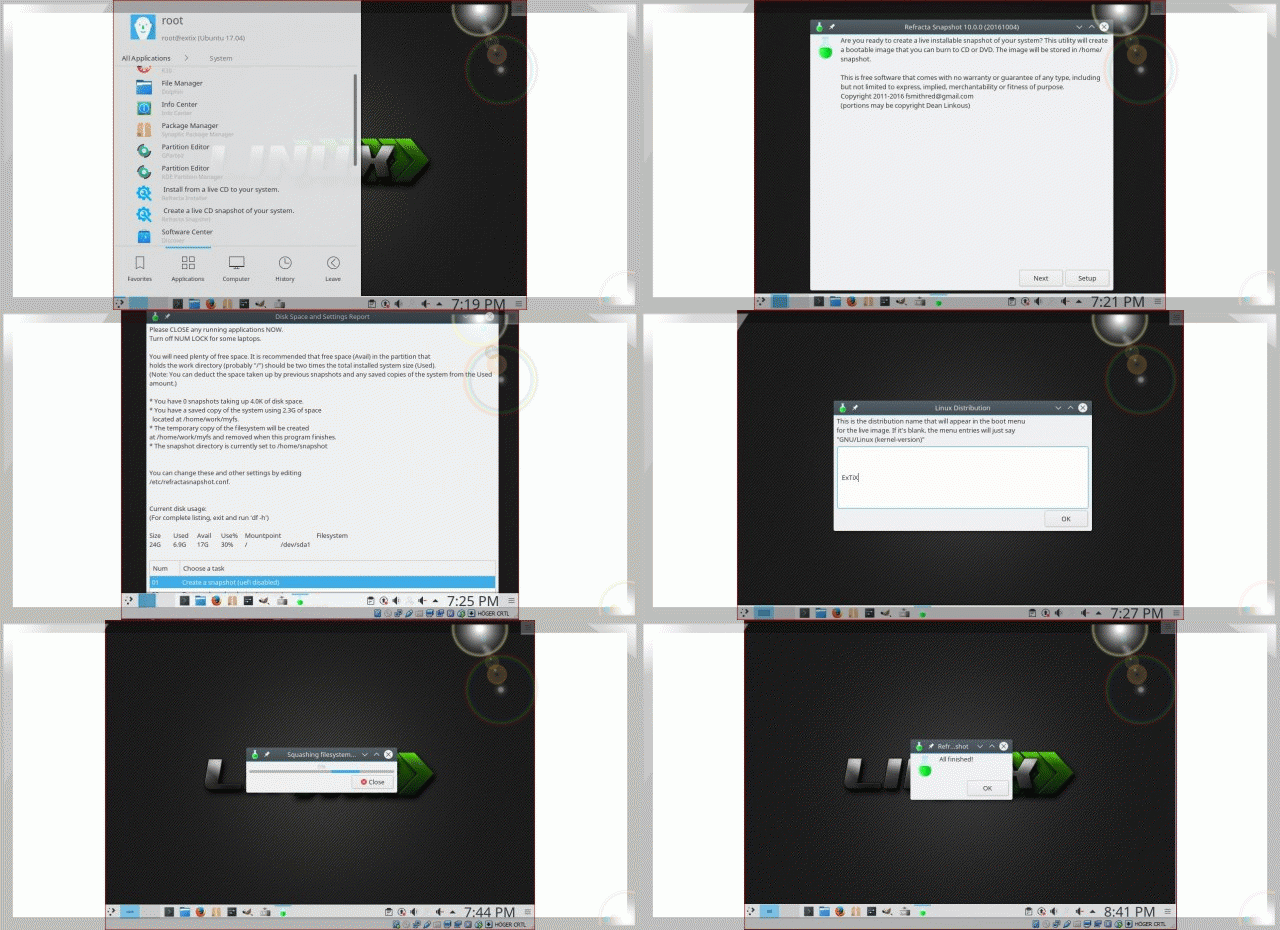
While running ExTiX Deepin 19.0 live or from hard drive you can use Refracta Tools (pre-installed) to create your own live installable Ubuntu system. A ten year child can do it! Watch a slideshow below.
About Calamares Installer
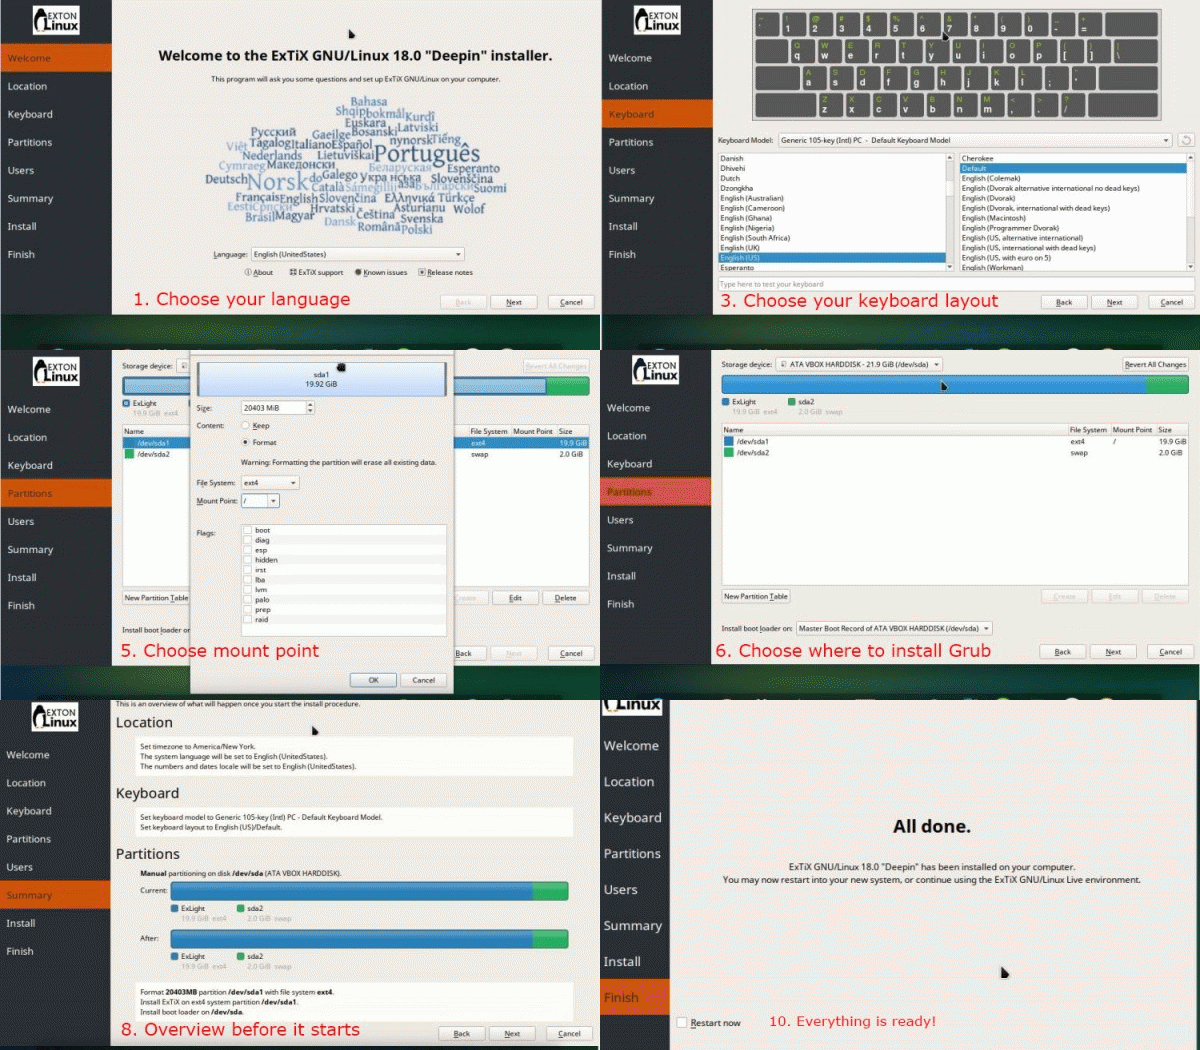
Calamares is an installer framework. By design it is very customizable, in order to satisfy a wide variety of needs and use cases. Calamares aims to be easy, usable, beautiful, pragmatic, inclusive and distribution-agnostic. Calamares includes an advanced partitioning feature, with support for both manual and automated partitioning operations. It is the first installer with an automated “Replace Partition” option, which makes it easy to reuse a partition over and over for distribution testing. Watch a movie when I’ve started to install ExTiX Deepin using Calamares. See also a slideshow below showing the whole Calamares install process.

Using Calamares you can choose language when the installation starts. When it’s ready everything will be in your chosen language!
About Grub and Calamares
If you already have one Linux system (for example Ubuntu) installed on your computer you can refrain from installing Grub during the installation of ExTiX Deepin (for example on /dev/sda5). Instead just add the lines below in Ubuntu. I.e. to /boot/grub/grub.cfg. Or start up Ubuntu and run the command sudo update-grub. Start data for ExTiX will then be added to Grub automatically. Example Grub configuration – see below – when ExTiX Deepin has been installed on /dev/sda5.
menuentry ‘ExTiX Deepin (sda5) 181208’ –class gnu-linux –class gnu –class os $menuentry_id_option ‘gnulinux-simple-ccde3409-b7fc-4759-af5e-69b557c97467’ {
insmod gzio
insmod part_gpt
insmod ext2
set root=’hd0,gpt5′
if [ x$feature_platform_search_hint = xy ]; then
search –no-floppy –fs-uuid –set=root –hint-bios=hd0,gpt9 –hint-efi=hd0,gpt5 –hint-baremetal=ahci0,gpt5 ccde3409-b7fc-4759-af5e-69b557c97467
else
search –no-floppy –fs-uuid –set=root ccde3409-b7fc-4759-af5e-69b557c97467
fi
linux /boot/vmlinuz-4.20.0-rc4-exton root=UUID=ccde3409-b7fc-4759-af5e-69b557c97467 rw
initrd /boot/initrd.img-4.20.0-rc4-exton
}
NOTE:On certain computers you may have to add nomodeset to the boot line so it looks like this:
linux /boot/vmlinuz-4.20.0-rc4-exton root=UUID=ccde3409-b7fc-4759-af5e-69b557c97467 rw nomodeset
Or you may have to have a boot line looking like this:
linux /boot/vmlinuz-4.20.0-rc4-exton root=UUID=ccde3409-b7fc-4759-af5e-69b557c97467 rw quiet splash acpi_rev_override=1 nouveau.modeset=0
Special notes about using Calamares in ExTiX
ExTiX runs very well live in VirtualBox and VMware. If you want to install ExTiX in VirtualBox/VMware or on a non UEFI-enabled computer you’ll have to replace grub-efi-amd64 with grub-pc. Do it like this.
1. Start up Calamares Installer a go through all installation steps. Watch this YouTube video. In the end of the installation you will get a message saying that the installation has failed – screenshot. That’s because Calamares is made for UEFI-enabled computers. Just close Calamares Installer.
2. To be able to boot ExTiX in VirtualBox or VMware from the virtual hard drive you’ll have to chroot into the install partition (normally /dev/sda1) and manually install Grub. Run the following commands:
mkdir /mnt/sda1
mount /dev/sda1 /mnt/sda1
mount -t proc proc /mnt/sda1/proc
mount -o bind /sys /mnt/sda1/sys
mount –bind /dev /mnt/sda1/dev
mount -o bind /dev/pts /mnt/sda1/dev/pts
chroot /mnt/sda1 /bin/bash – screenshot
apt update
apt install grub-pc
grub-install /dev/sda
update-grub – screenshot
exit
umount /mnt/sda1/proc
umount /mnt/sda1/sys
umount /mnt/sda1/dev/pts
umount /mnt/sda1/dev
umount /mnt/sda1
3. Close down VirtualBox or VMware and remove the ExTiX ISO file. Start up ExTiX from the virtual hard drive. Everything will be alright. NOTE: Normally you shall use Refracta Installer for installing ExTiX on non UEFI-enabled computers (including VirtualBox and VMware). Then you don’t have to chroot as described above. Just replace grub-efi-amd64 with grub-pc before you start up Refracta Installer. If you nevertheless want to use Calamares for installing on a non UEFI-enabled computer you can do that providing that you already have Grub2 installed (on another partition). Just edit your Grub2 configuration when the installation of ExTiX is ready – see my example above.
Used KERNEL
My special kernel 4.12.0-rc4-exton corresponding Kernel.org’s kernel 4.2-rc4.
What’s new in Linux kernel 4.20?
Login to Deepin Desktop
Log in from LightDM Login Manager as the ordinary user live with password live or. You can’t login to Deepin as root. While logged in as live you can use Sudo to become root. Example commands: sudo su or sudo pcmanfm. The password for root is root.
USB installation
Read my instruction.
Install ExTiX to hard drive using Refracta Installer
Just start the install program Refracta Installer from the Deepin Menu (Refracta Installer). Then just follow the instructions. NOTE: If you want to install Grub as bootloader while installing ExTiX on a non UEFI-enabled computer you’ll have to replace grub-efi-amd64 with grub-pc. Just run the command sudo apt update followed by sudo apt install grub-pc before you start the install program Refracta Installer. Watch this screenshot. VirtualBox and VMware are examples of non UEFI-enabled computers. You can’t use Calamares for installations in VirtualBox and VMware (unless you afterwards chroot into the install partition as described above). You’ll have to use Refracta Installer and first replace grub-efi-amd64 with grub-pc.
VirtualBox and VMware
ExTiX Deepin 19.0 runs very well live in VirtualBox and VMware. If you want to install ExTiX 19.0 in VirtualBox/VMware or on a non UEFI-enabled computer you’ll have to replace grub-efi-amd64 with grub-pc. Just run the command sudo apt update followed by sudo apt install grub-pc before you start the install program Refracta Installer. Screenshot when Refracta Installer has completed in VirtualBox. You can’t use Calamares (without doing a chroot as described above). Note: When running ExTiX live in VirtualBox and/or VMware you may have to start in failsafe mode. Otherwise you may not have sound when running for example Netflix or YouTube.
Spotify
You may want to install Spotify in ExTiX or another Debian/Ubuntu system. Just go ahead. It’s very easy. Follow this instruction for Ubuntu. Or just run the command sudo apt update followed by sudo apt install spotify-client.
Printing using Cups
It’s really very simple to install a printer in ExTiX/Ubuntu. Cups (Common UNIX Printing System) is already installed. Open up Firefox and go to http://localhost:631/admin. See the following five screenshots showing when I added my local printer HP Photosmart Wireless in ExTiX KDE.
1. Cups start page
2. Add the printer
3. Add a local printer
4. Configuration of the added printer
5. Printing a test document
Refracta Tools
While running ExTiX Deepin 19.0 live or from hard drive you can use Refracta tools (pre-installed) to create your own live installable Ubuntu system. A ten year child can do it! Watch a slideshow below. (The slideshow is for ExTiX Budgie 17.7, but Refracta tools works in the same way in ExTiX Deepin). You don’t even have to install ExTiX to hard drive before you can use the Refracta tools. If you have plenty of RAM you can create a new (your own!) Ubuntu system while running ExTiX from a DVD or a USB stick. Please note that the whole Refracta process (creating your new ISO) will only take 10 – 15 min! You’ll find the ISO in /home/snapshots. (Or change that in /etc/refractasnapshot.conf).
Wireless connections
Normally NetworkManager works very well in ExTiX Deepin. Just add your network password and connect. If you, however, after a hard drive installation can’t reach the Internet you shall run the command sudo dpkg-reconfigure resolvconf and reboot your computer.
Why two versions of ExTiX Deepin?
The thing is that the packages grub-pc and grub-efi-amd64 can’t be installed at the same time. To be able to use Calamares Installer on non-efi computers grub-pc has to be installed. ExTiX Deepin 18.8 Build 180815 is for non UEFI-enabled computers.
SCREENSHOTS
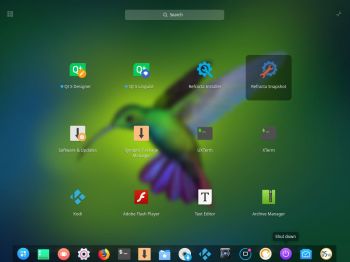
1. ExTiX Deepin 15.5 Desktop
2. ExTiX Deepin being installed in VirtualBox using Refracta Installer
3. ExTiX Deepin (NON-UEFI) Build 180815 being installed in VirtualBox using Calamares Installer
4. ExTiX Deepin running Refracta snapshot
5. ExTiX Deepin running in VMware
6. ExTiX Deepin running the Refracta Installer
6. ExTiX Deepin login screen (LightDM)
8. Movie showing how to enable Window effects
9. A small movie made with Deepin Screen Recorder
10. Kodi 18.0 running in ExTiX 19.0
11. ExTiX boot screen when running live
12. ExTiX boot screen when running from hard drive
Deepin Screen Recorder
In ExTiX Deepin you can record everything you do. Watch this small video. Or a video when I’ve started Calamares Installer.
Compatibility
A general truth: If an original system can run on a particular computer an Exton Build of the same original system can run on the same computer. I never change a Linux system for the worse in terms of auto configuration and hardware detection, etc. It happens that I replace the original kernel, but always to a “better” one with even more native support for various hardware etc. (Which I have done in this case).

DOWNLOAD
Download ExTiX 19.0/18.8 Deepin (two versions) from SourceForge.net – Fast, secure and free downloads from the largest Open Source applications and software directory.

md5sum for extix-19.0-64bit-deepin-refracta-calamares-kodi18-1760mb-181208.iso
md5sum for extix-18.8-64bit-deepin-refracta-calamares-non-efi-1600mb-20180815.iso


